🔍 What are Trigger Rules in HelloSend?
Trigger Rules in HelloSend are powerful automation workflows that help you automatically respond to customer interactions and streamline your messaging and CRM processes.
- Instead of manually handling every incoming message, Trigger Rules allow the system to take predefined actions whenever a specific event occurs
- Events include: receiving a message, a customer replying, or a conversation being updated
- These rules help businesses improve response time, reduce manual effort, and ensure consistent communication across channels like SMS | WhatsApp | RCS | Twilio WhatsApp
- Whether you're managing support queries, sales leads, or follow-ups, Trigger Rules enable you to automate repetitive tasks and focus on high-value conversations
⚙️ How Trigger Rules Work
Each Trigger Rule is built using three core components:
🔹 Trigger
- The Trigger defines the starting point of the workflow
- It specifies when the automation should begin
- Example: Incoming message received from a customer
- Example: A new conversation is created
- 👉 Once the trigger event occurs, the system checks the defined conditions
🔹 Conditions
- Conditions act as filters that determine when the rule should actually run
- This ensures that automation only happens when specific criteria are met
-
You can define conditions based on:
- Keywords (e.g., message contains "pricing" or "support")
- Country or phone number
- Time-based rules (business hours, custom hours)
- Channel or team
- 👉 Multiple conditions can be combined to create highly targeted workflows
🔹 Actions
- Actions define what happens when both the trigger and conditions are satisfied
-
Common actions include:
- Sending an automatic reply to the customer
- Creating a lead/contact in the CRM
- Logging activities or notes
- Sending internal notifications
- 👉 You can configure one or multiple actions within a single rule
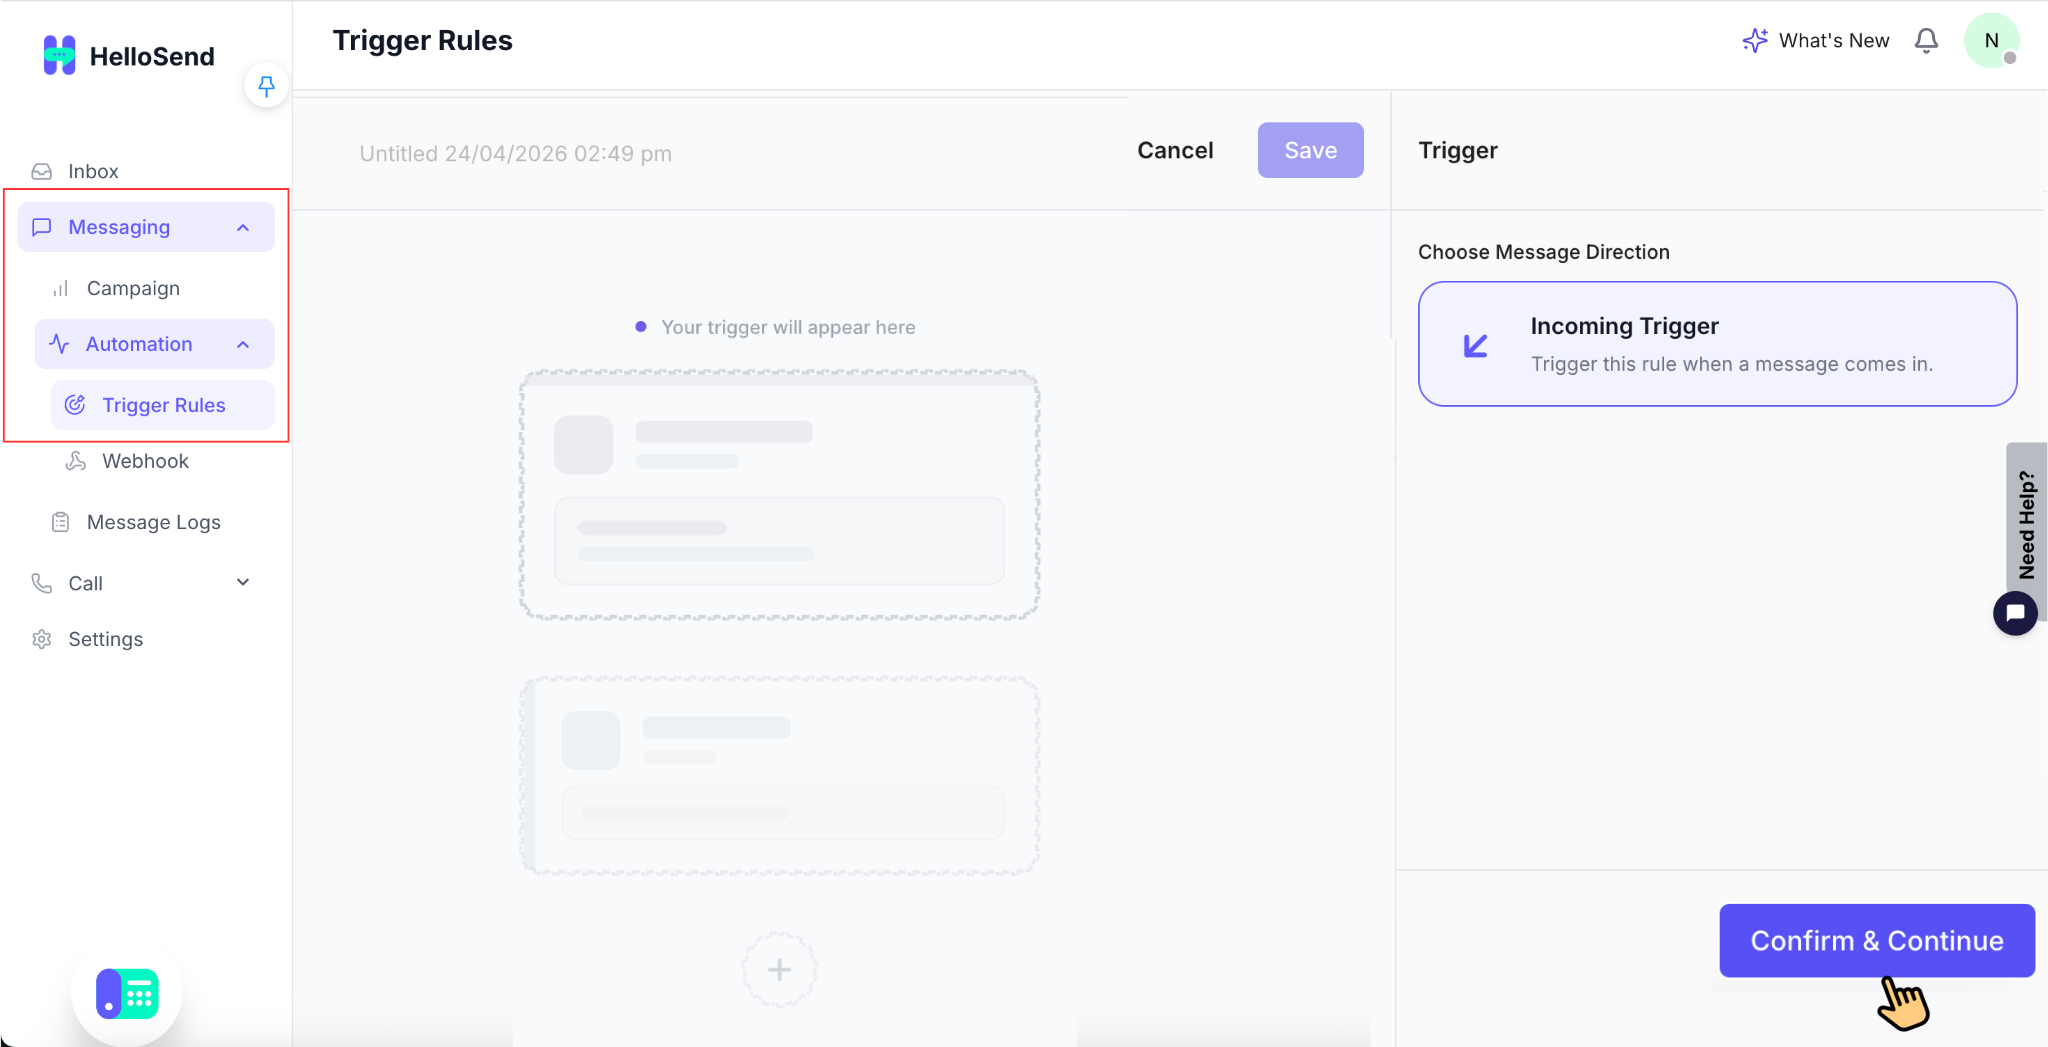
1. Create a New Trigger Rule
To start building an automation workflow, first navigate to the Trigger Rules section:
- Go to → Messaging → Automation → Trigger Rules
Once you are on the Trigger Rules dashboard:
- Click on "Create Rule" to begin setting up a new automation
- This will open the visual workflow builder, where you can design your rule step-by-step
👉 Inside the workflow builder, you can:
- Define the Trigger (when the rule should start)
- Add Conditions (to control when it should run)
- Configure Actions (what should happen automatically)
The visual builder makes it easy to create, modify, and manage automation workflows without any technical setup.
2. Configure Trigger (Incoming Message)
After creating a new rule, the next step is to define when the automation should start by configuring the trigger.
- Select Incoming Trigger
- Choose Message Direction: Incoming
- This ensures the rule is triggered whenever a message is received from a customer
- Click Confirm & Continue
👉 This means the rule will automatically initiate every time a customer sends a message through any connected channel (SMS | WhatsApp | RCS | Twilio WhatsApp).
⚙️ What Happens Next
Once you click Confirm & Continue, the trigger setup is completed. You will now see two key options:
🔹 Add Condition
- Use this to define when the rule should run by applying filters
-
You can configure conditions based on:
- Keywords (e.g., "pricing", "support")
- Sender details (phone number, country)
- Time settings (business hours, custom hours)
- Channel or team
- 👉 Conditions help ensure the rule runs only for relevant messages

🔹 Add Action
- Use this to define what should happen when the trigger and conditions are met
-
You can configure actions such as:
- Sending an automatic reply
- Creating or updating CRM records
- Logging notes or activities
- Sending internal notifications
- 👉 Multiple actions can be added to a single rule
💡 Pro Tip: If no conditions are added, the rule will run for all incoming messages. To make your automation more targeted, always combine triggers with relevant conditions.
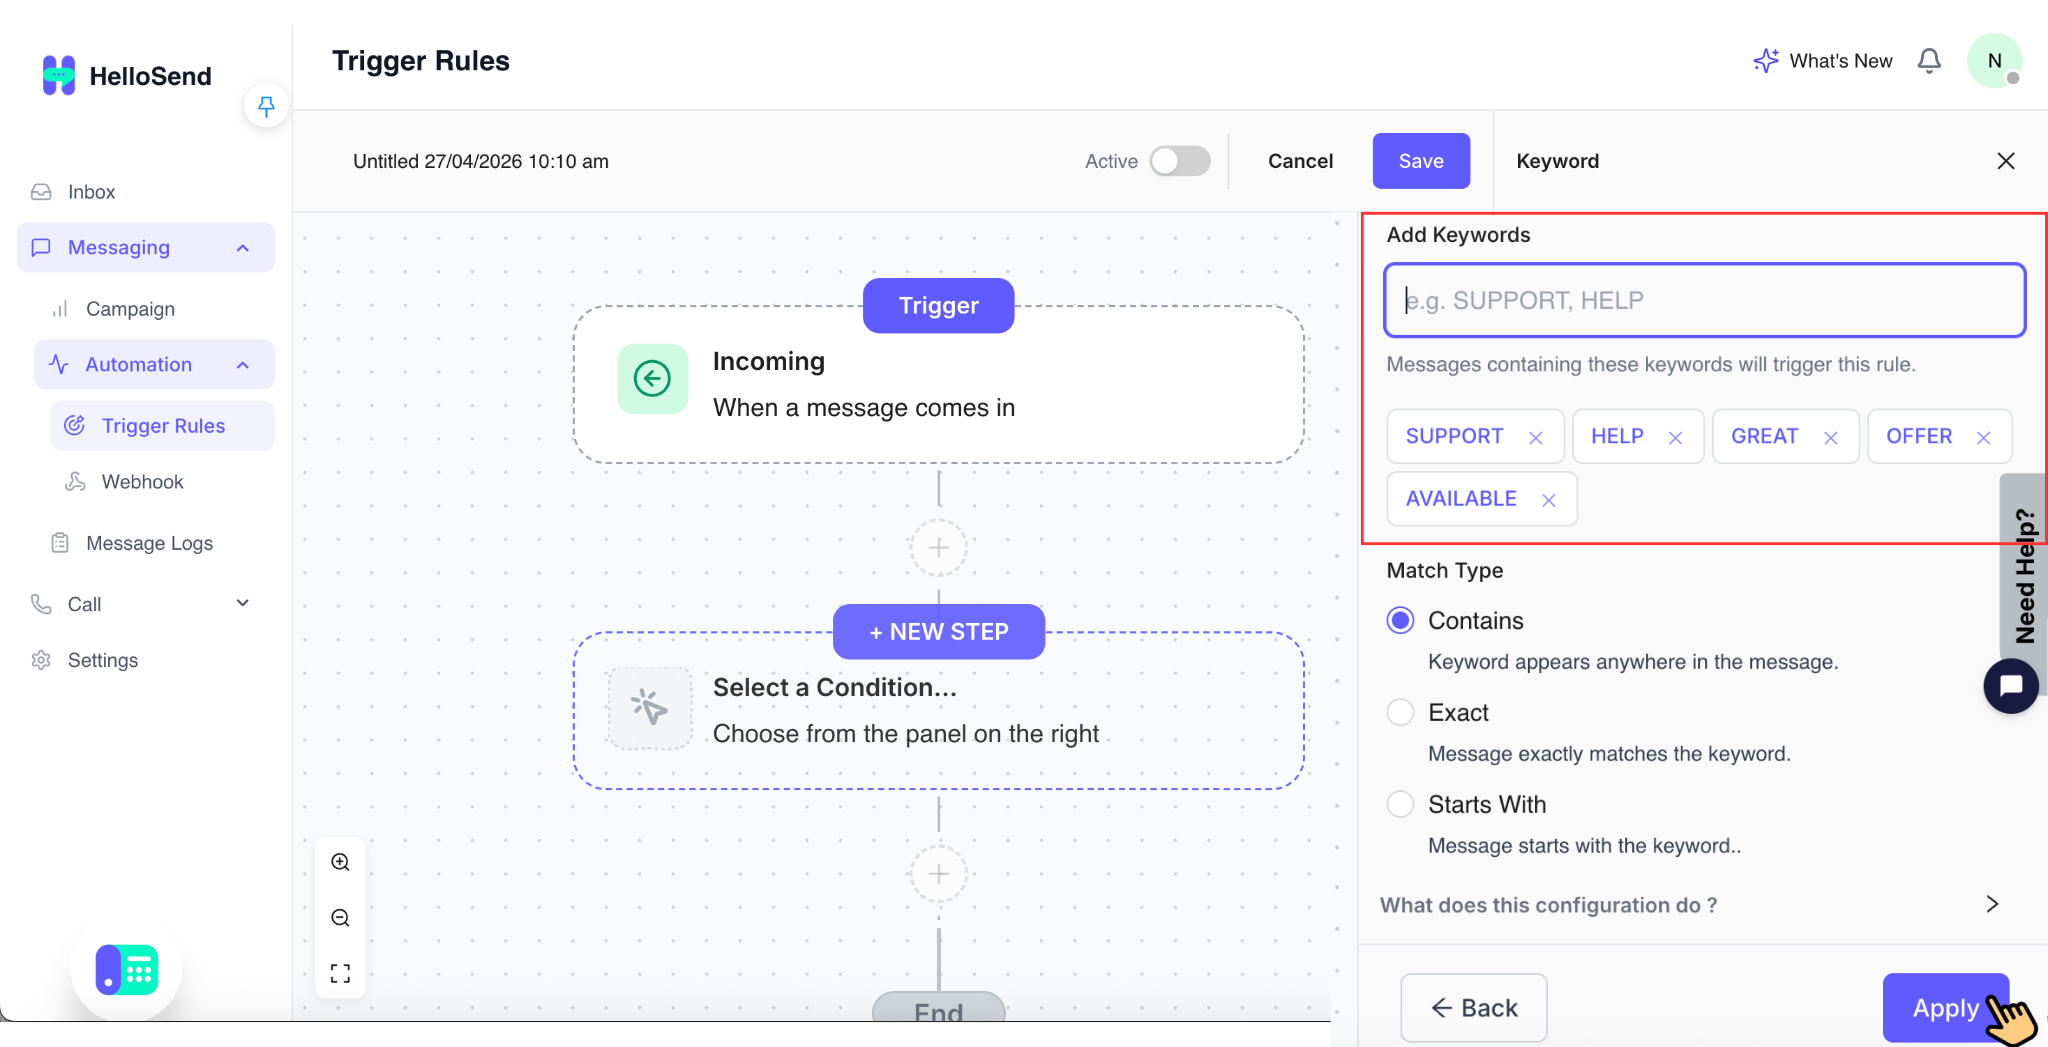
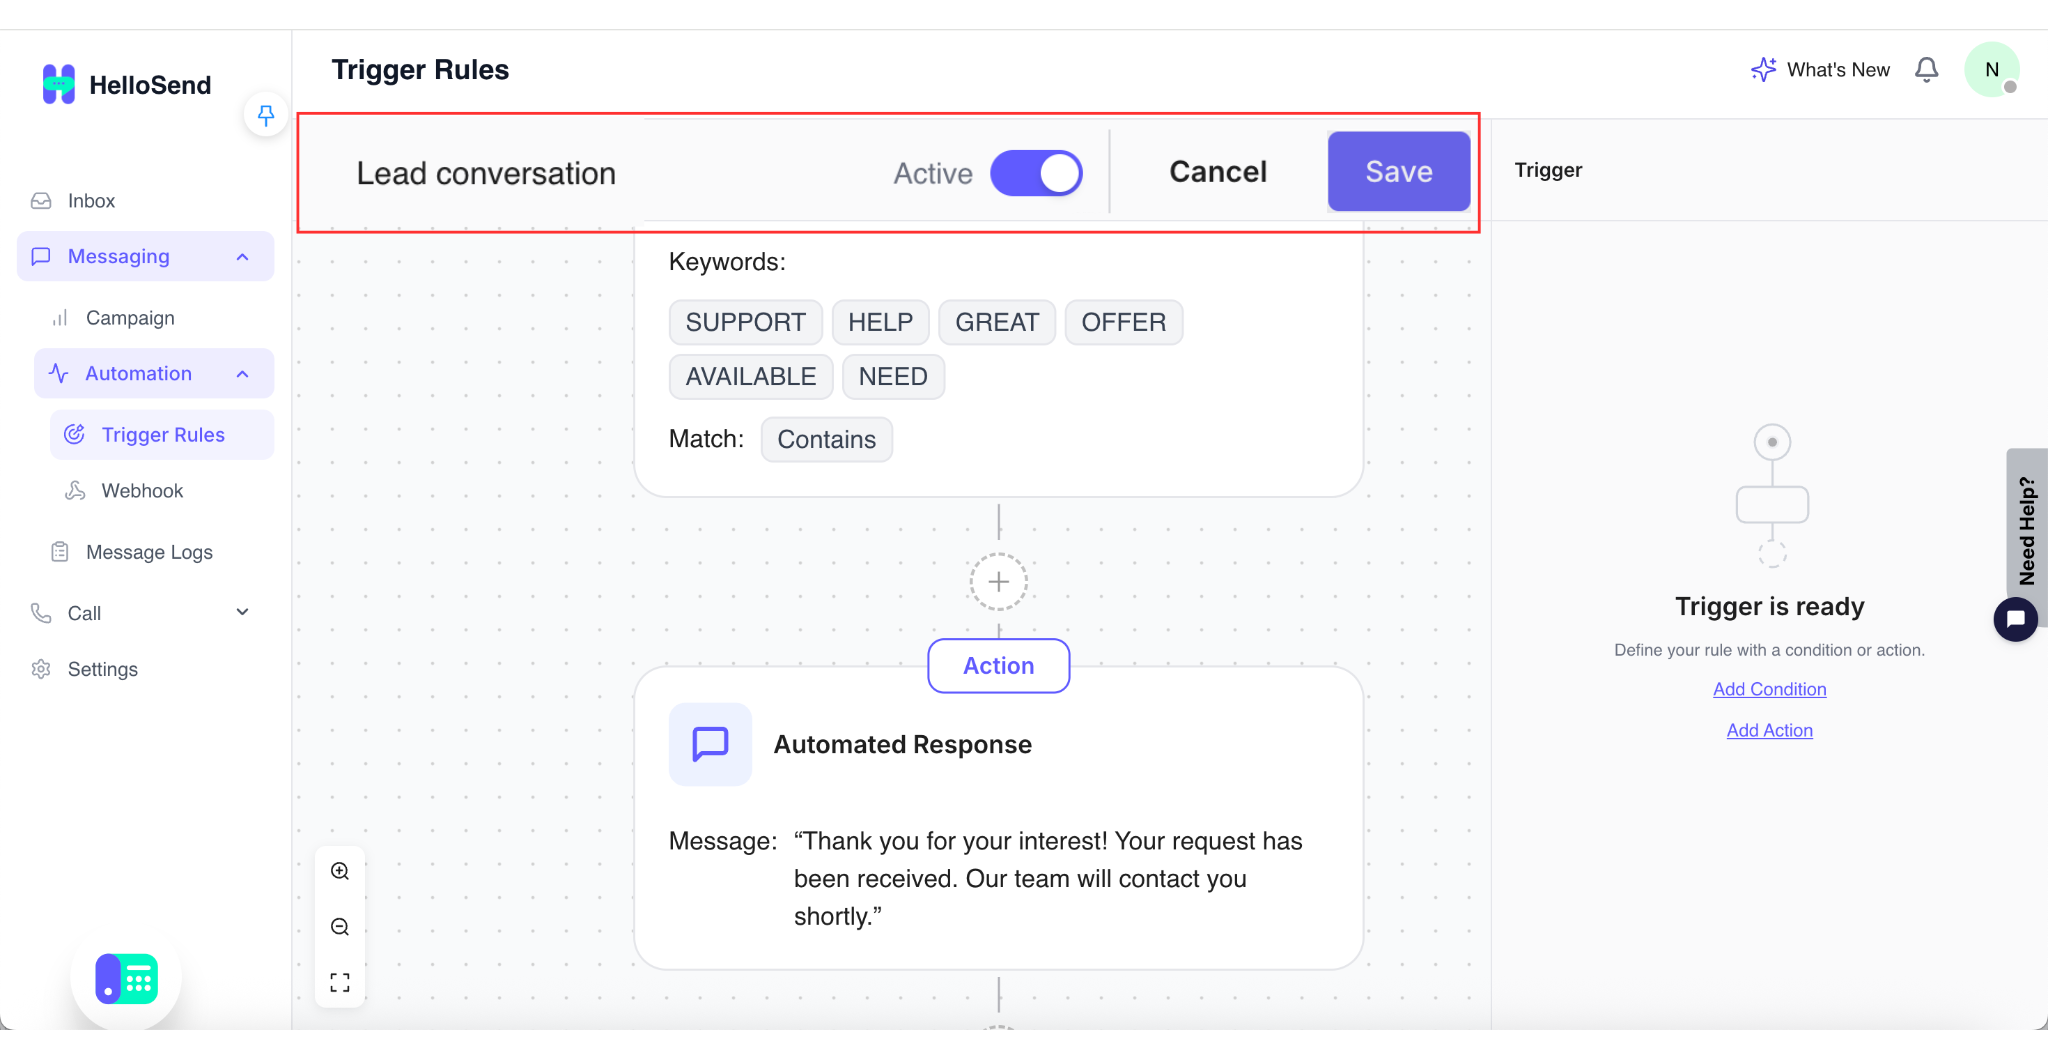
3. Configure Conditions
Conditions determine when the rule should run. Each condition acts as a filter and is displayed as a separate node, allowing you to precisely control when the trigger is executed.
🔑 Add Keywords Condition
- Use keywords to define which messages should activate the rule
- Only messages that match the specified keywords will trigger the workflow
- Add keywords that should trigger the rule — multiple keywords can be added
-
Match Types:
- Contains — The rule is triggered if the keyword appears anywhere in the message
- Exact — The rule is triggered only when the message exactly matches the keyword
- Starts With — The rule is triggered if the message begins with the specified keyword
- 👉 Example: "price", "cost", "pricing"
👉 Note: You can add multiple keywords and combine conditions to create more targeted and accurate automation rules.
📞 Numbers for Automation
- Select specific numbers where the rule should apply
- Supports multiple numbers
- Only HelloSend-configured numbers can be used
- 👉 Ensures automation runs only on selected communication channels
🌍 Country Filter
- Select one or multiple countries
- If selected → applies only to those countries
- If not selected → applies globally
- 👉 Helps localize communication workflows
⏰ Run Schedule
Control when the rule should be active:
- 24/7 → The rule is always active and runs at all times, regardless of your business hours. Useful for workflows that should never stop, such as auto-responses or lead capture.
- Business Hours → The rule runs only during your defined working hours. Messages received within this time will trigger the rule.
- Outside Business Hours → The rule runs only outside your working hours. Ideal for after-hours automation, such as sending auto-replies or setting expectations.
- Specific Hours (Custom) → Define custom time ranges to control exactly when the rule should run. Useful for targeting specific time windows, such as lunch hours, campaigns, or region-based schedules.
👉 Useful for auto-replies or after-hours support.
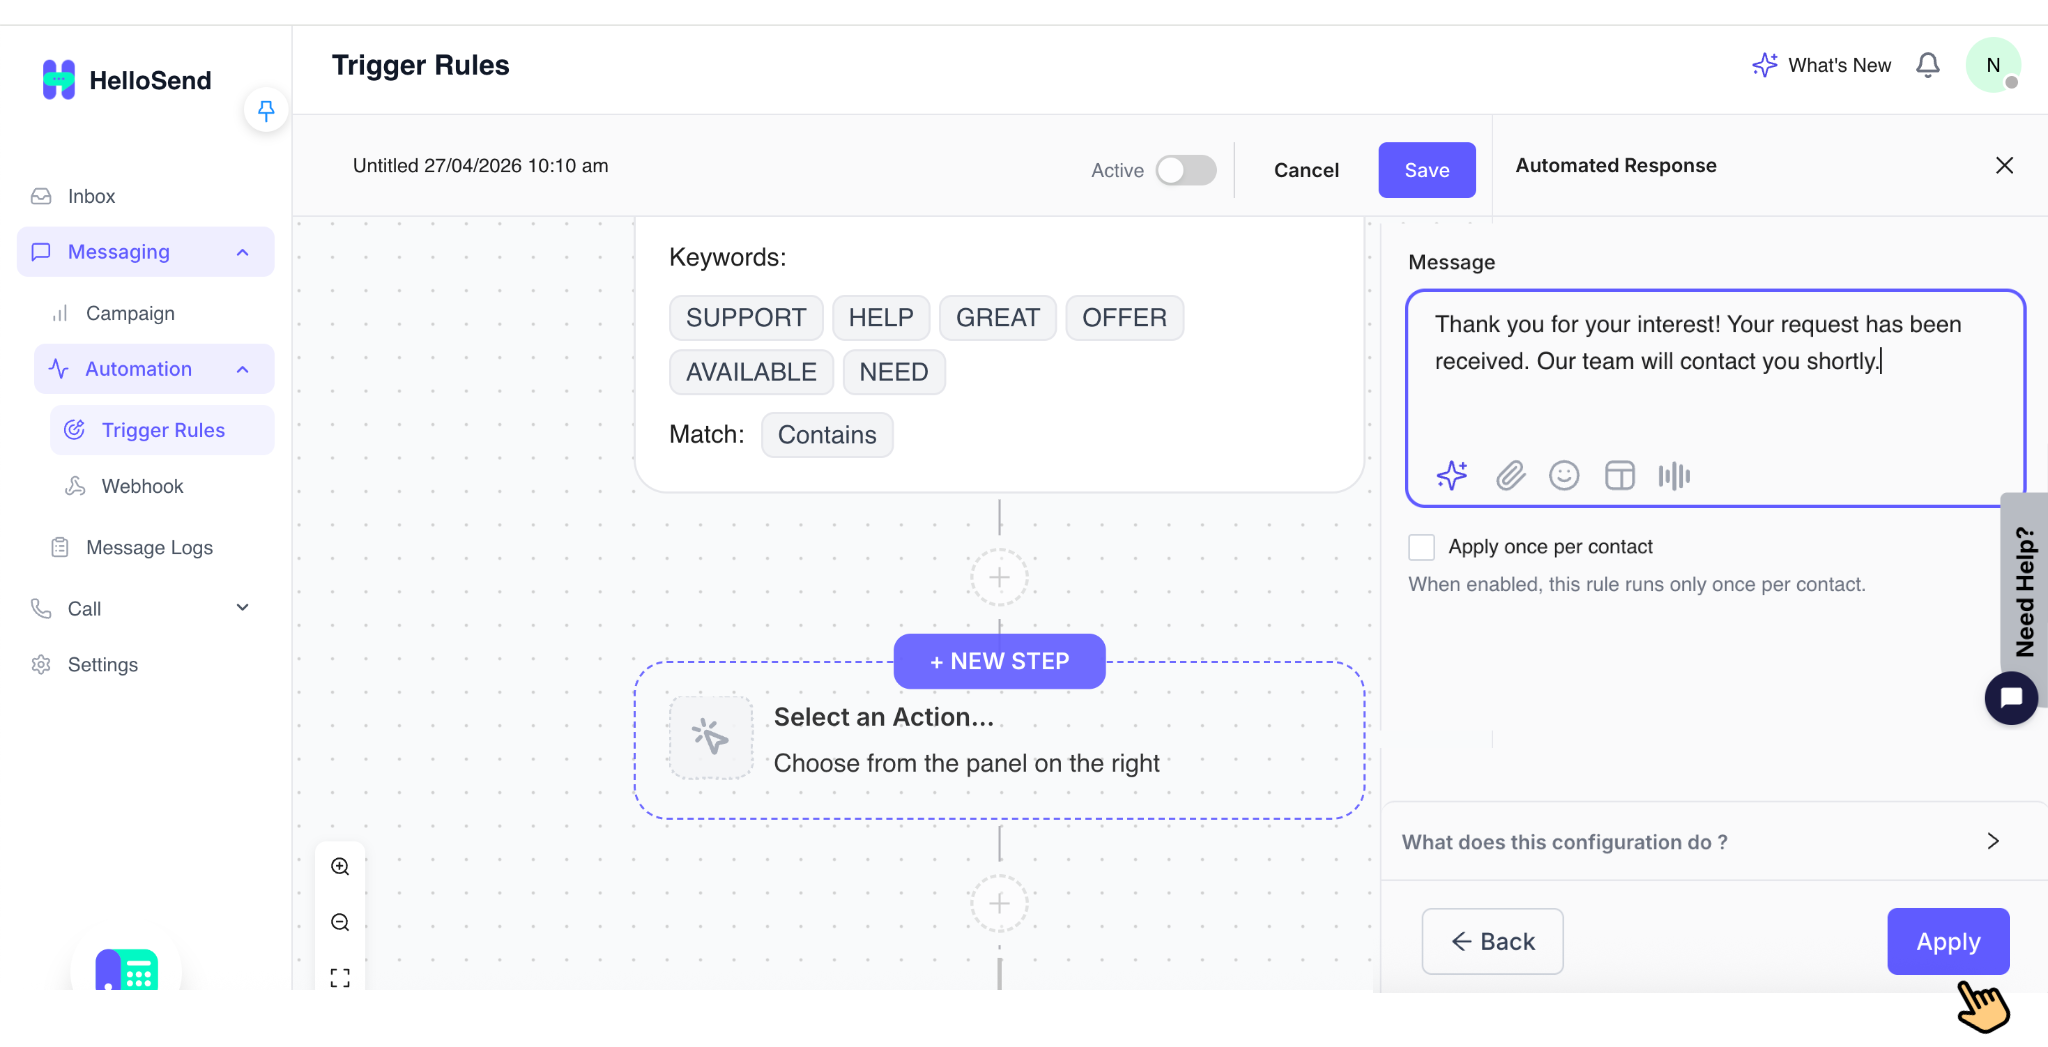
4. Configure Actions
Actions define what should happen automatically when the trigger is activated and all conditions are met. This is where you automate responses, notifications, CRM updates, and lead creation.
You can configure one or multiple actions within a single rule to build a complete automation flow.
💬 Automated Response
- Automatically send replies to customers based on predefined templates
- Use message templates to ensure consistent and professional communication
-
Ideal for:
- Welcome messages
- Support acknowledgments
- Pricing or FAQ responses
- Option: Run once per unique number
- 👉 Ensures the automated reply is sent only once per customer, preventing repeated or spammy responses
📧 Email Notification
- Notify your team instantly when a message is received or when specific conditions are met
-
Recipients can include:
- Record Owner – The user assigned to the contact/lead
- Account Owner – The main account administrator
- Custom Email Address – Any specific email for alerts
- 👉 Helps your team stay updated in real-time, especially for high-priority or time-sensitive messages
📝 Log in CRM
- Automatically log customer interactions in your CRM to maintain a complete communication history
- 👉 Ensures better visibility, tracking, and follow-ups across your team
-
Logging Preference:
- Notes → Logs messages as simple notes in the CRM timeline. Best for quick reference and lightweight tracking.
- Activities → Logs messages as structured activities. Best for tracking tasks, follow-ups, and reporting.
-
Apply Log to Records:
- All Matching Records → Logs the message to all matching records. Useful when contacts are linked to multiple deals.
- Most Recent Record Only → Logs only to the latest active record. Helps avoid duplication.
🧾 Create Lead (CRM)
- Automatically create a new lead in your CRM when a message meets specific conditions
-
👉 This ensures:
- No potential customer is missed
- Every inquiry is captured and tracked
- Sales teams can follow up efficiently
- Especially useful for capturing new inbound leads from SMS | WhatsApp | RCS | Twilio WhatsApp
🧾 Add Delay (Optional)
The Delay feature allows you to introduce a time gap between actions within a Trigger Rule. Instead of executing all actions instantly, you can schedule them to run after a specific duration.
⏱️ How It Works
- Add a delay step between actions in your workflow
- Set the delay duration based on your requirement
-
Supported Range:
- Minimum: 15 minutes
- Maximum: 30 days
- 👉 After the delay period, the next action in the workflow will automatically execute
🎯 Why Use Delay?
- Adding delays helps you create timed workflows instead of sending all responses at once
- This improves customer experience and avoids overwhelming users with multiple messages
💡 Common Use Cases
- Follow-up Messages — Send a reminder if the customer hasn't responded after a certain time
- Drip Campaigns — Send a sequence of messages over time (e.g., Day 1 intro → Day 3 follow-up → Day 7 offer)
- Lead Nurturing — Gradually engage leads with relevant information instead of instant bulk messaging
- After-Hours Response — Delay messages to send during business hours for better engagement
⚙️ Example Workflow
-
1
Customer sends a message
-
2
System sends an instant auto-reply
-
3
Add a 1-day delay
-
4
Send a follow-up message if no response
👉 This creates a smooth, automated follow-up experience without manual effort.
💡 Pro Tip: You can combine multiple actions in a single rule—for example:
- Send an auto-reply
- Create a lead in CRM
- Notify the sales team
👉 This allows you to build fully automated workflows that handle customer communication from start to finish.
6. Save the Rule
Once you have configured the Trigger, Conditions, Actions, Delay, and Logging settings, the final step is to review and save your rule.
👀 Preview Workflow
- Before saving, use the Preview Workflow option to carefully review your entire setup
- Verify the Trigger is correct (e.g., incoming message)
- Check all Conditions to ensure the rule runs only when intended
- Confirm each Action is properly configured
- Review Delay and Logging preferences
- 👉 This step helps you avoid errors and ensures your automation behaves exactly as expected
💾 Click Save
- Once everything looks correct: Click Save to store the rule
- 👉 The system will securely save your configuration without activating it immediately
📂 Stored Under Custom Flows
- After saving, the rule will appear under Custom Flows in the Trigger Rules dashboard
-
From here, you can:
- View the workflow
- Edit or update configurations
- Duplicate for similar use cases
- Delete if no longer needed
- 👉 This acts as your central place to manage all automation workflows
🔘 Make the Rule Active
- After saving, the rule is created but not yet active
- Turn on the Active toggle switch to enable the rule
- Once activated, the rule will start running automatically based on your configuration
- 👉 Until the toggle is enabled, the rule will not execute—even if all conditions are met
💡 Pro Tip: Always test your rule after activating it by sending a sample message. This ensures:
- The trigger fires correctly
- Conditions are working as expected
- Actions are executed properly
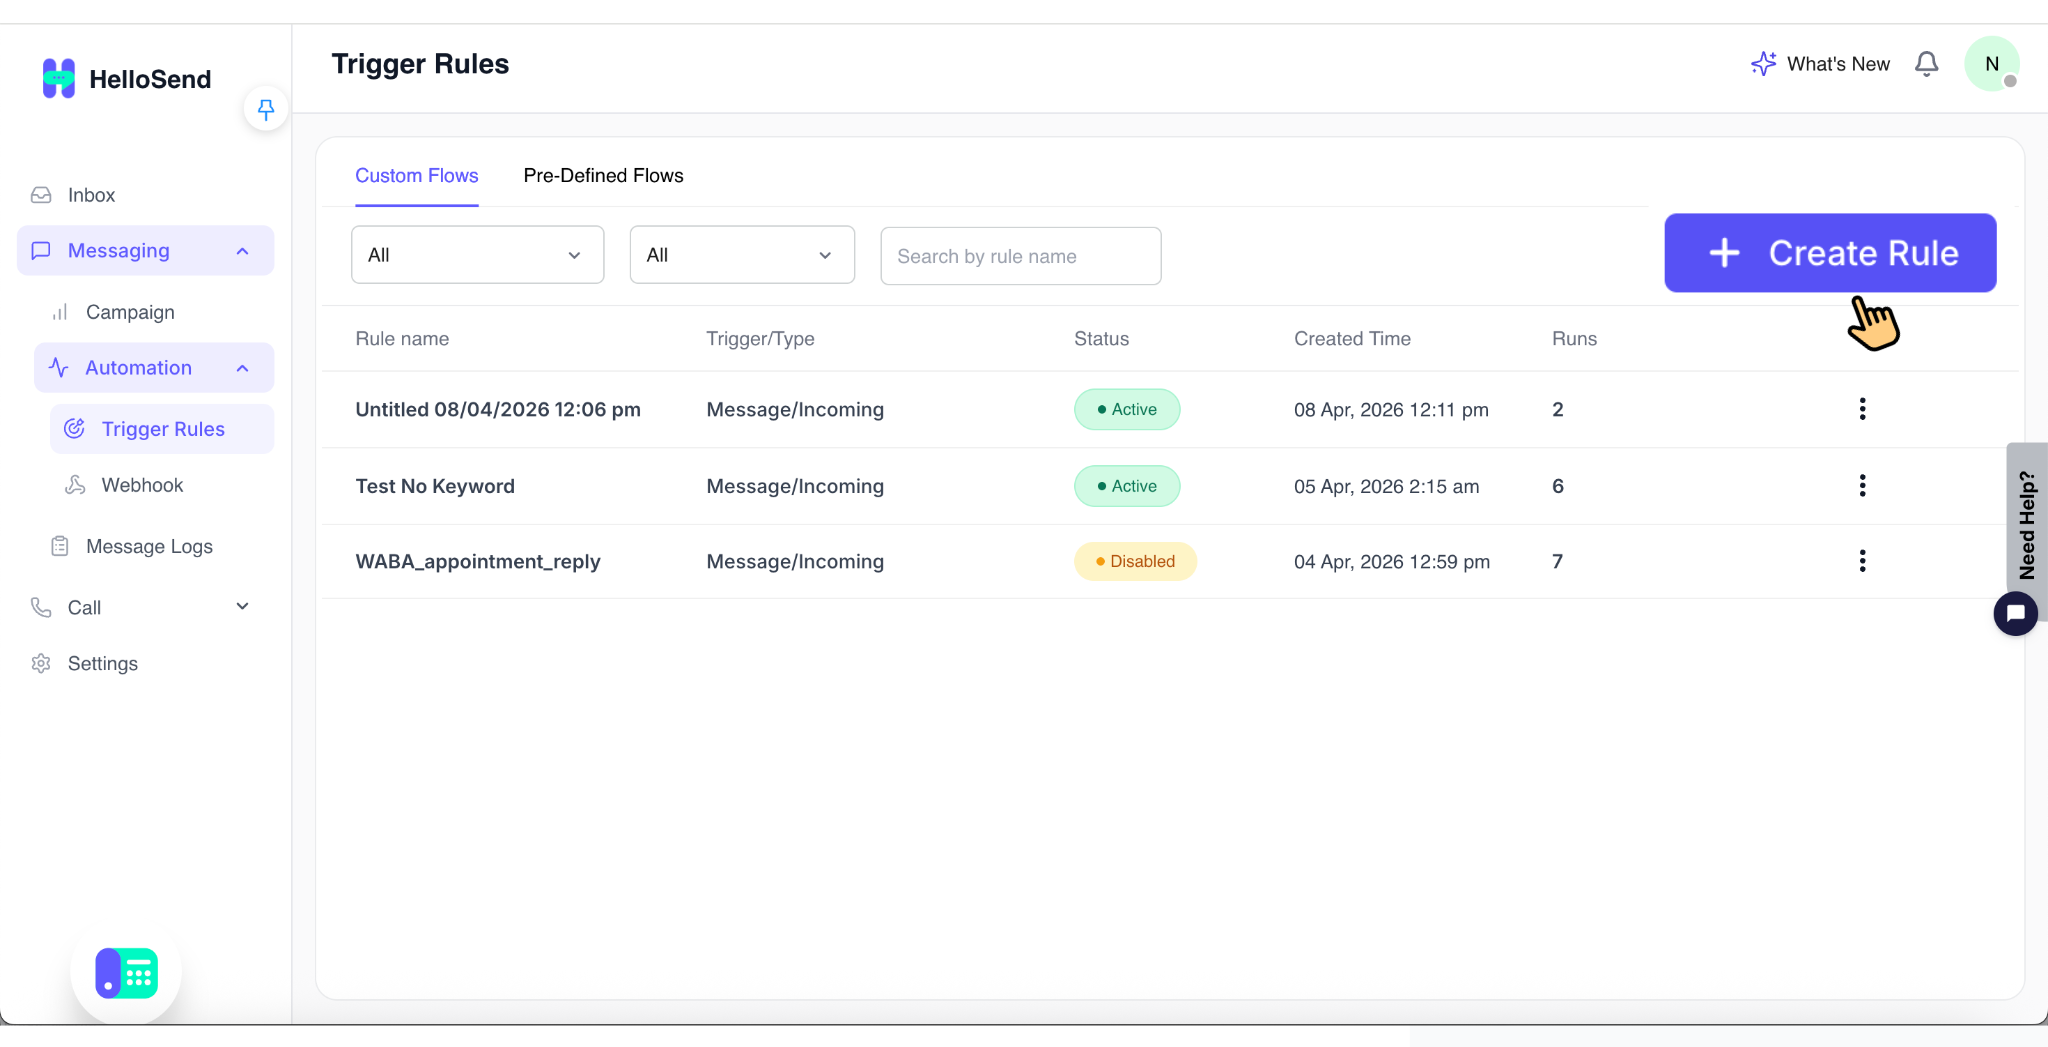
📊 Trigger Rules Table Overview
Each rule will appear as a row in the table with key details:
- Rule Name → Displays the name of the automation rule for easy identification
- Status → Shows whether the rule is Active or Inactive (controlled via toggle)
- Created Time → Indicates when the rule was created
- Message Run Status → Displays how the rule is performing (e.g., triggered, executed, or pending)
👉 This table gives you a quick overview of all your automation workflows and their current state.
💡 Example Use Case: Pricing Inquiry Automation
🎯 Scenario
A customer sends a message like: "What is the price?" — Instead of manually replying and updating systems, HelloSend can handle this automatically using Trigger Rules.
⚙️ Workflow Breakdown
1️⃣ Trigger → Incoming Message
- The workflow starts when a customer sends a message through any connected channel (SMS | WhatsApp | RCS | Twilio WhatsApp)
- 👉 This ensures every inbound query is captured instantly
2️⃣ Condition → Keyword Contains "price"
- The system checks if the incoming message contains keywords like: "price", "pricing", "cost"
- 👉 This ensures the rule only runs for pricing-related inquiries
3️⃣ Actions
Once the condition is met, multiple actions are executed automatically:
- 💬 Send Pricing Response — Instantly sends a predefined message with pricing details or a relevant link. 👉 Provides immediate value to the customer without delay.
- 🧾 Create CRM Lead — Automatically creates a new lead in your CRM. 👉 Ensures no potential customer is missed.
- 📧 Notify Sales Team — Sends an internal notification to the sales team. 👉 Helps the team follow up quickly with high-intent prospects.
- 📝 Log Conversation — Saves the interaction in the CRM as notes or activities. 👉 Maintains a complete communication history.
🚀 Result
With this automation in place:
-
Customer receives an instant reply
-
A lead is created automatically in the CRM
-
Sales team is notified in real-time
-
Conversation is logged for tracking and follow-up
🌟 Key Benefits of Trigger Rules
⚡ Automated Customer Responses
Trigger Rules allow you to automatically respond to common customer queries such as pricing, support requests, or general inquiries.
👉 This reduces manual effort, ensures consistent messaging, and guarantees that customers always receive a timely response—even outside business hours.
🚀 Faster Lead Generation
Every incoming message can be instantly converted into a CRM lead without manual data entry.
👉 This ensures no potential customer is missed and helps your sales team capture and act on opportunities in real-time.
⏱ Improved Response Time
With automation in place, customers receive instant replies the moment they send a message.
👉 Faster responses lead to higher engagement, better customer experience, and improved conversion rates.
🔄 Workflow Automation
Trigger Rules automate repetitive tasks such as sending messages, logging interactions, and notifying teams.
👉 This eliminates manual work and allows your team to focus on more important, high-value activities.
📢 Real-Time Team Notifications
Automatically notify the right team members when important messages are received.
👉 This ensures quick internal coordination, especially for high-priority or sales-related conversations.
📂 Organized CRM Data
All interactions are automatically logged in your CRM as notes or activities, depending on your preference.
👉 This keeps your data structured, improves visibility, and makes follow-ups more effective.
🎯 Flexible Automation Control
You can customize Trigger Rules using keywords, phone numbers or countries, time-based conditions, and channels or teams.
👉 This flexibility allows you to create highly targeted and precise automation workflows.
📈 Scalable Communication
Handle a large volume of customer messages across multiple channels without increasing your team size.
👉 Automation ensures your business can scale communication efficiently while maintaining quality and consistency.
🏁 Conclusion
Trigger Rules in HelloSend provide a powerful and flexible way to automate customer communication and streamline business workflows. By combining triggers, conditions, and actions, businesses can eliminate repetitive tasks and ensure every interaction is handled efficiently.
With automation in place, teams can shift their focus from manual operations to meaningful conversations that drive results. Whether it's responding instantly to customer queries, capturing leads, updating CRM records, or notifying team members, Trigger Rules enable scalable, reliable, and intelligent communication—making them an essential feature for modern messaging and CRM workflows.